It is only in the absence of light, that darkness emerges.
In times where tele-conferences and newsfeeds determine our daily lives, it might be the perfect time for a “lighter-to-digest-read”. This article is exactly that! Let’s discover how to improve the lighting level and contrast while using a webcam to teach and meet up online. Some do-it-yourself tricks and tools you can find at home.
We all know the feeling: another online meeting is coming up, using yet another (web-based?) application. First, we know that we have to get through setting up the microphone and camera. How satisfied we are when it finally works, so in doubt we are when launching the next application and noticing one or another setting is wrong again, leaving us muted. Well, that is not what this article is about ! This article is about the moment where you’ve finally established a good connection and then you realise that your conversation partner (or you yourself, cause face it, we all love to awkwardly stare a bit at ourselves in that second window) appear to be as dark as a shadow on a bright brick wall. Let’s call in the help of our VUB professor in Lighting, Prof. Valéry Ann Jacobs to shed some light on this problem:

The basic principles on which this article is based, stem from photography : i.e. portrait and product photography. The difference being that it is not a state-of-the-art camera and a moving photographer taking your picture but instead your static webcam making a video : that is one lesser degree-of-freedom so it makes your job easier. In this article, we’ll learn how to control the lighting with respect to the subject. : what light distributions are preferred, and how does light interact, e.g. reflect, with our surroundings, e.g. walls, curtains, glass) and with the subject.
The light source can be either daylighting or artificial lighting : typically LEDs, fluorescent or incandescent lighting for indoor applications. Daylighting is very variable in nature depending on the time of the day and the time of the year, your geographical location and meteorological conditions. So we have to talk about the many circumstances that may happen. Needless to say that, once you grasp the basic principles, you will be able to apply them yourself to new situations. When using artificial lighting, e.g. in the evening when making a video-call with family and friends, mostly artificial lighting will be there to support you, which is static, meaning that it doesn’t change its position, colour temperature and intensity unless you deliberately change these settings yourself.
Direct Sunlight:
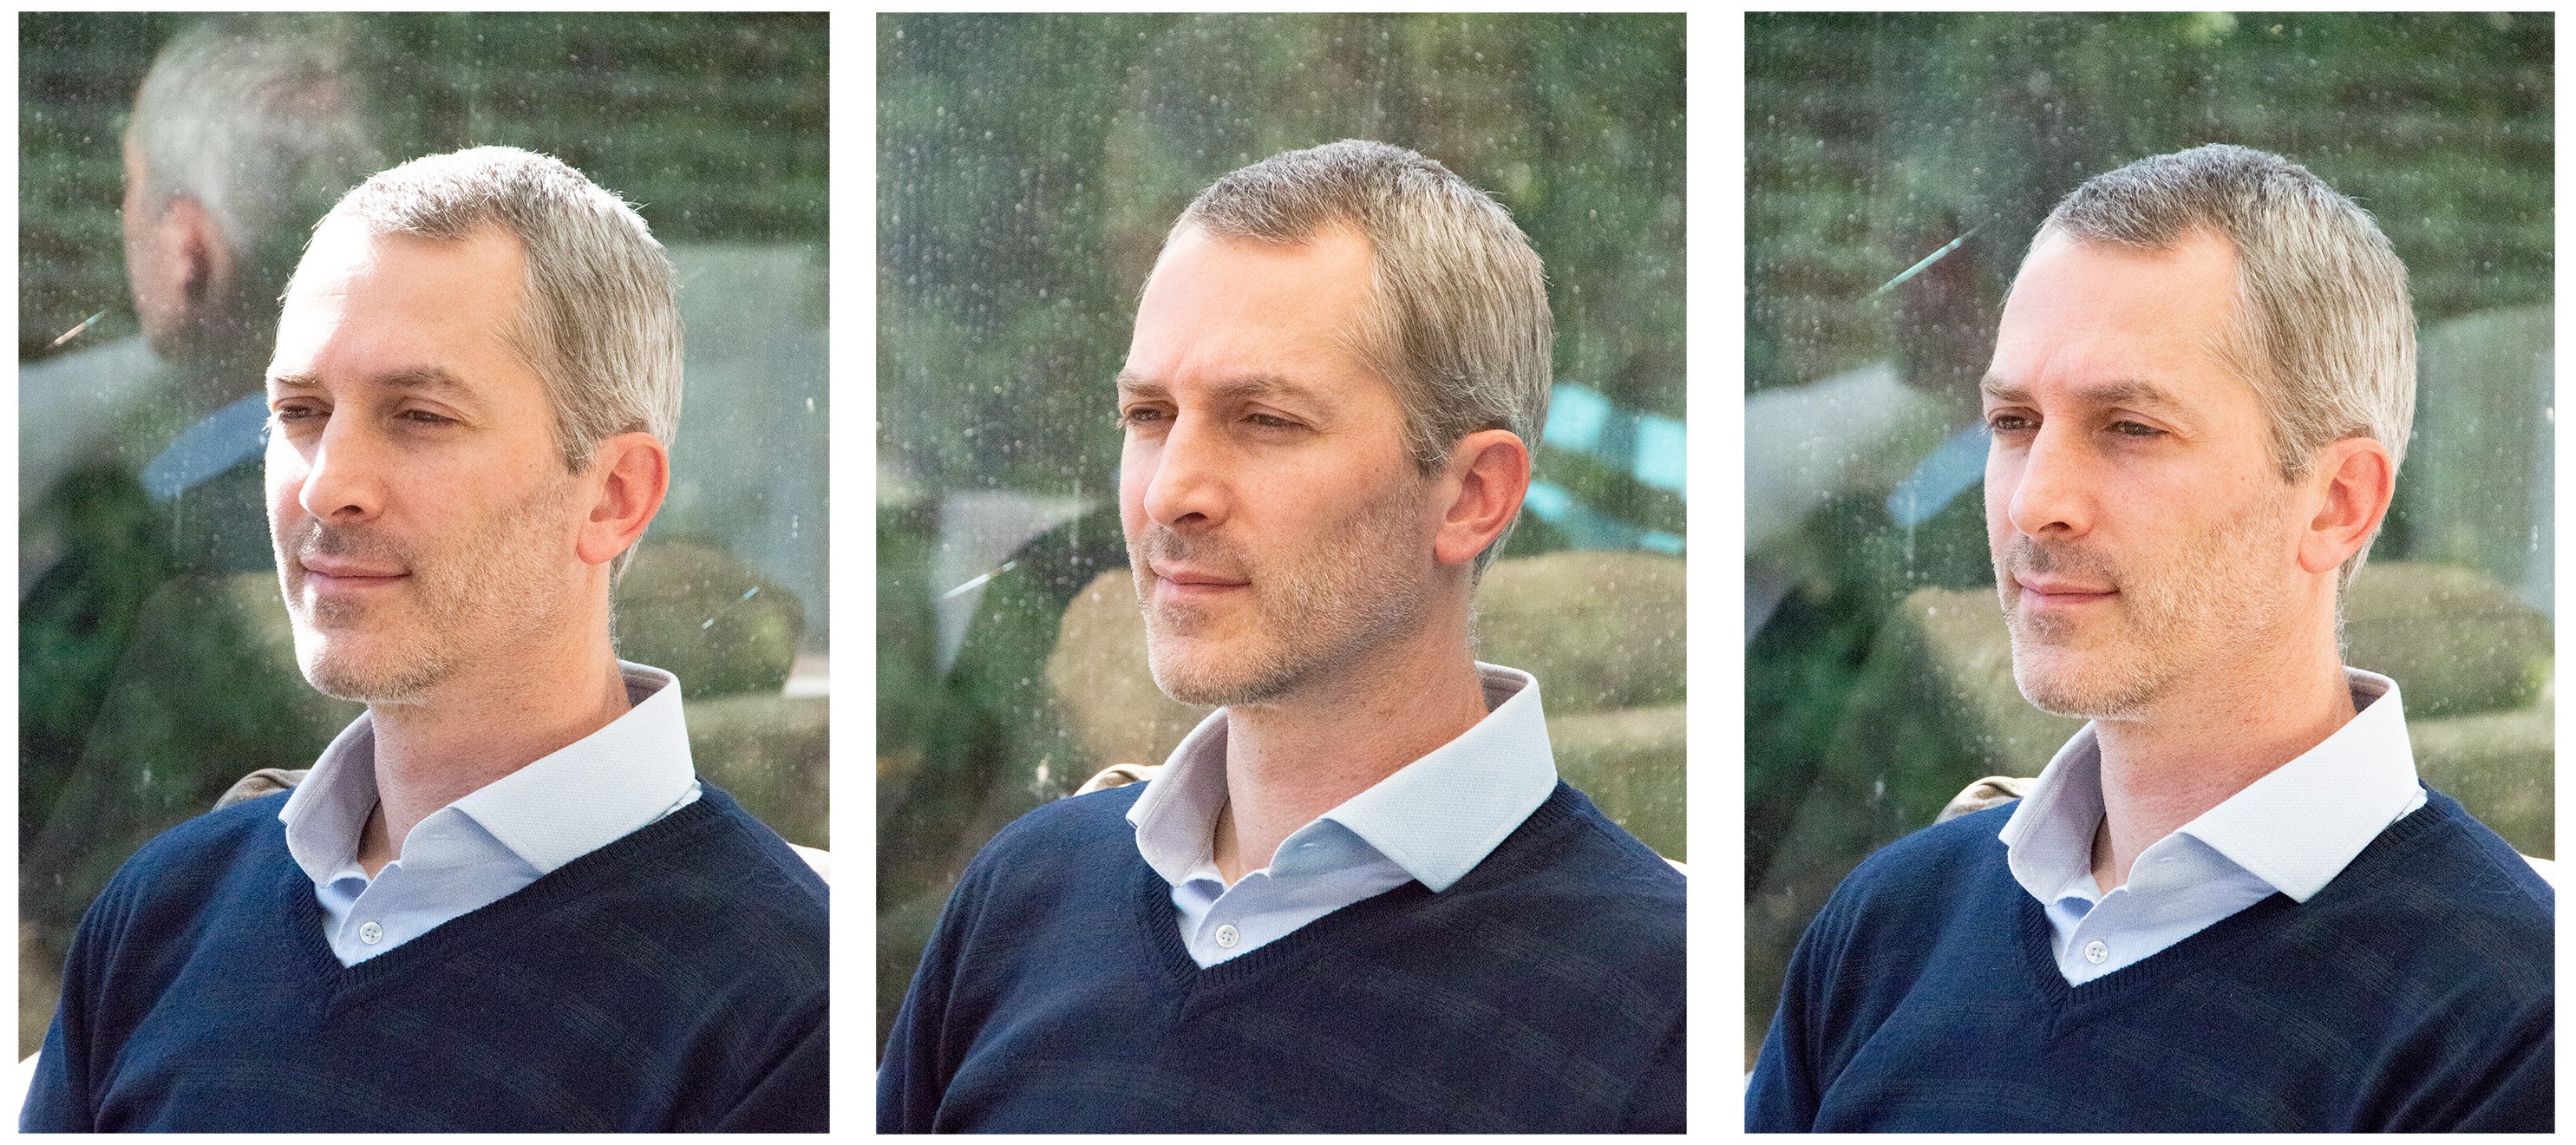
When there are no clouds, direct sun lighting falling onto your face can cause quite a few problems: high luminance, i.e. very bright areas, resulting in too high contrast, sharp unwanted shadow casts, e.g from your nose, and veiling glare on specularly reflecting objects, as can be seen in the left panel of the figure below. To resolve the contrast problem, we need to diffuse the light, i.e. to spread it more. This can be done with any material you have at home that is white or light-coloured and transmits light, e.g. some white A4 paper that you tape together or some kitchen or toilet paper (we all have enough of those at the time). Just attach it to the window so the direct sunlight no longer hits your face, but instead it is illuminated by a soft sheet of light. What you have physically done, is transforming a high luminance source (the sun) with a small solid angle with respect to your face into a source with a larger solid angle and a lower luminance. As the concept of solid angle is critical in lighting, allow me to explain this in a bit more detail: when explaining the concept to our students, I tell them that it is the projected surface of a light source divided by the square of the distance.
Now that probably doesn’t help you either, but please bare with me, as I will try to make it more understandable: the solid angle expresses how much space an object takes up in your field-of-view. When an object comes closer to you, it appears to become bigger—yet the surface stays the same, it is just the act of bringing it closer that makes it appear bigger. You can try that with any object lying in front of you now: stretch your arm holding the object and then bring it closer to your eyes, it appears to be bigger and you can see less and less of the environment. The Sun may be very large, but it is at a very large distance, so the solid angle of the Sun is smaller than that of a few pieces of paper taped together close to your face. You do lose some light when being transmitted through the paper, but that will not be a problem for modern-day camera’s, as can be seen in the middle panel. Instead it might still occur that one side of your face is more lit than the other side, thus causing a too high contrast. If on the other side of the room you have a light wall, move closer to it, and it will brighten the darker side of your face. If you do not have such wall, or you cannot move closer to it, the engineer in you has to take the better of you : with some paper and a cardboard, or using some white styrofoam, you can reflect some light back to the darker side of you face, thus brightening that side and reducing the contrast, as can be seen in the right panel. At the end of this article, I will show you all the tools I used for this tutorial.
Cloudy days:
So far, we’ve only dealt with direct sunlight. Yet, quite often, the weather is clouded and we are inside our homes working near a window. For now we will assume that the window provides us with enough light to work, without the need for artificial lighting which we will deal with in a second. We will consider a regular window and a roof window, e.g. in a gable roof.
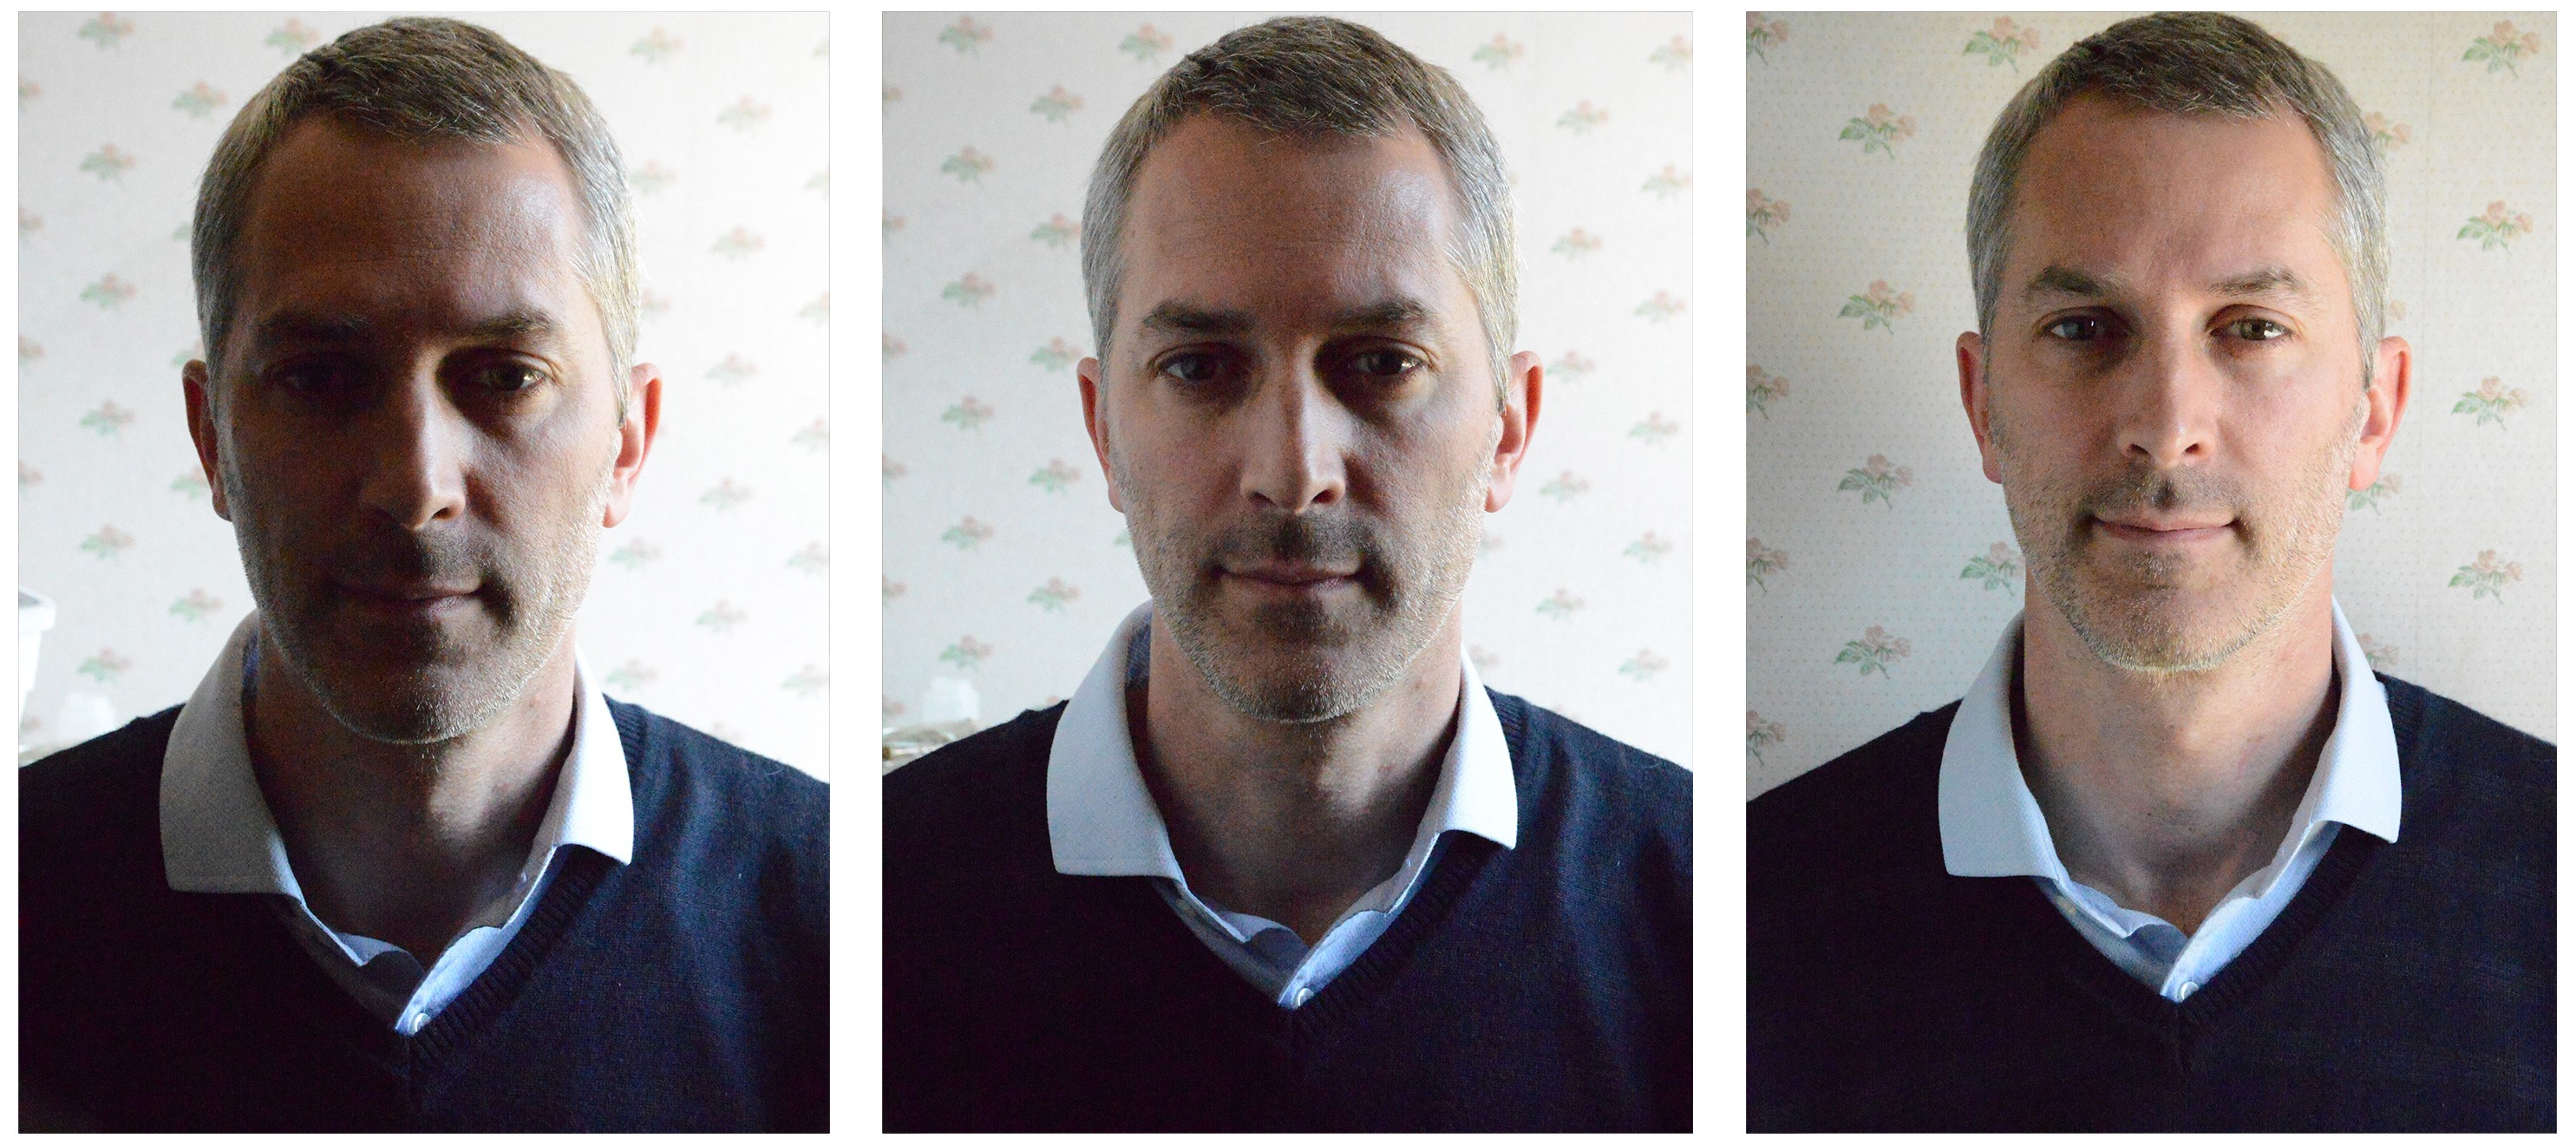
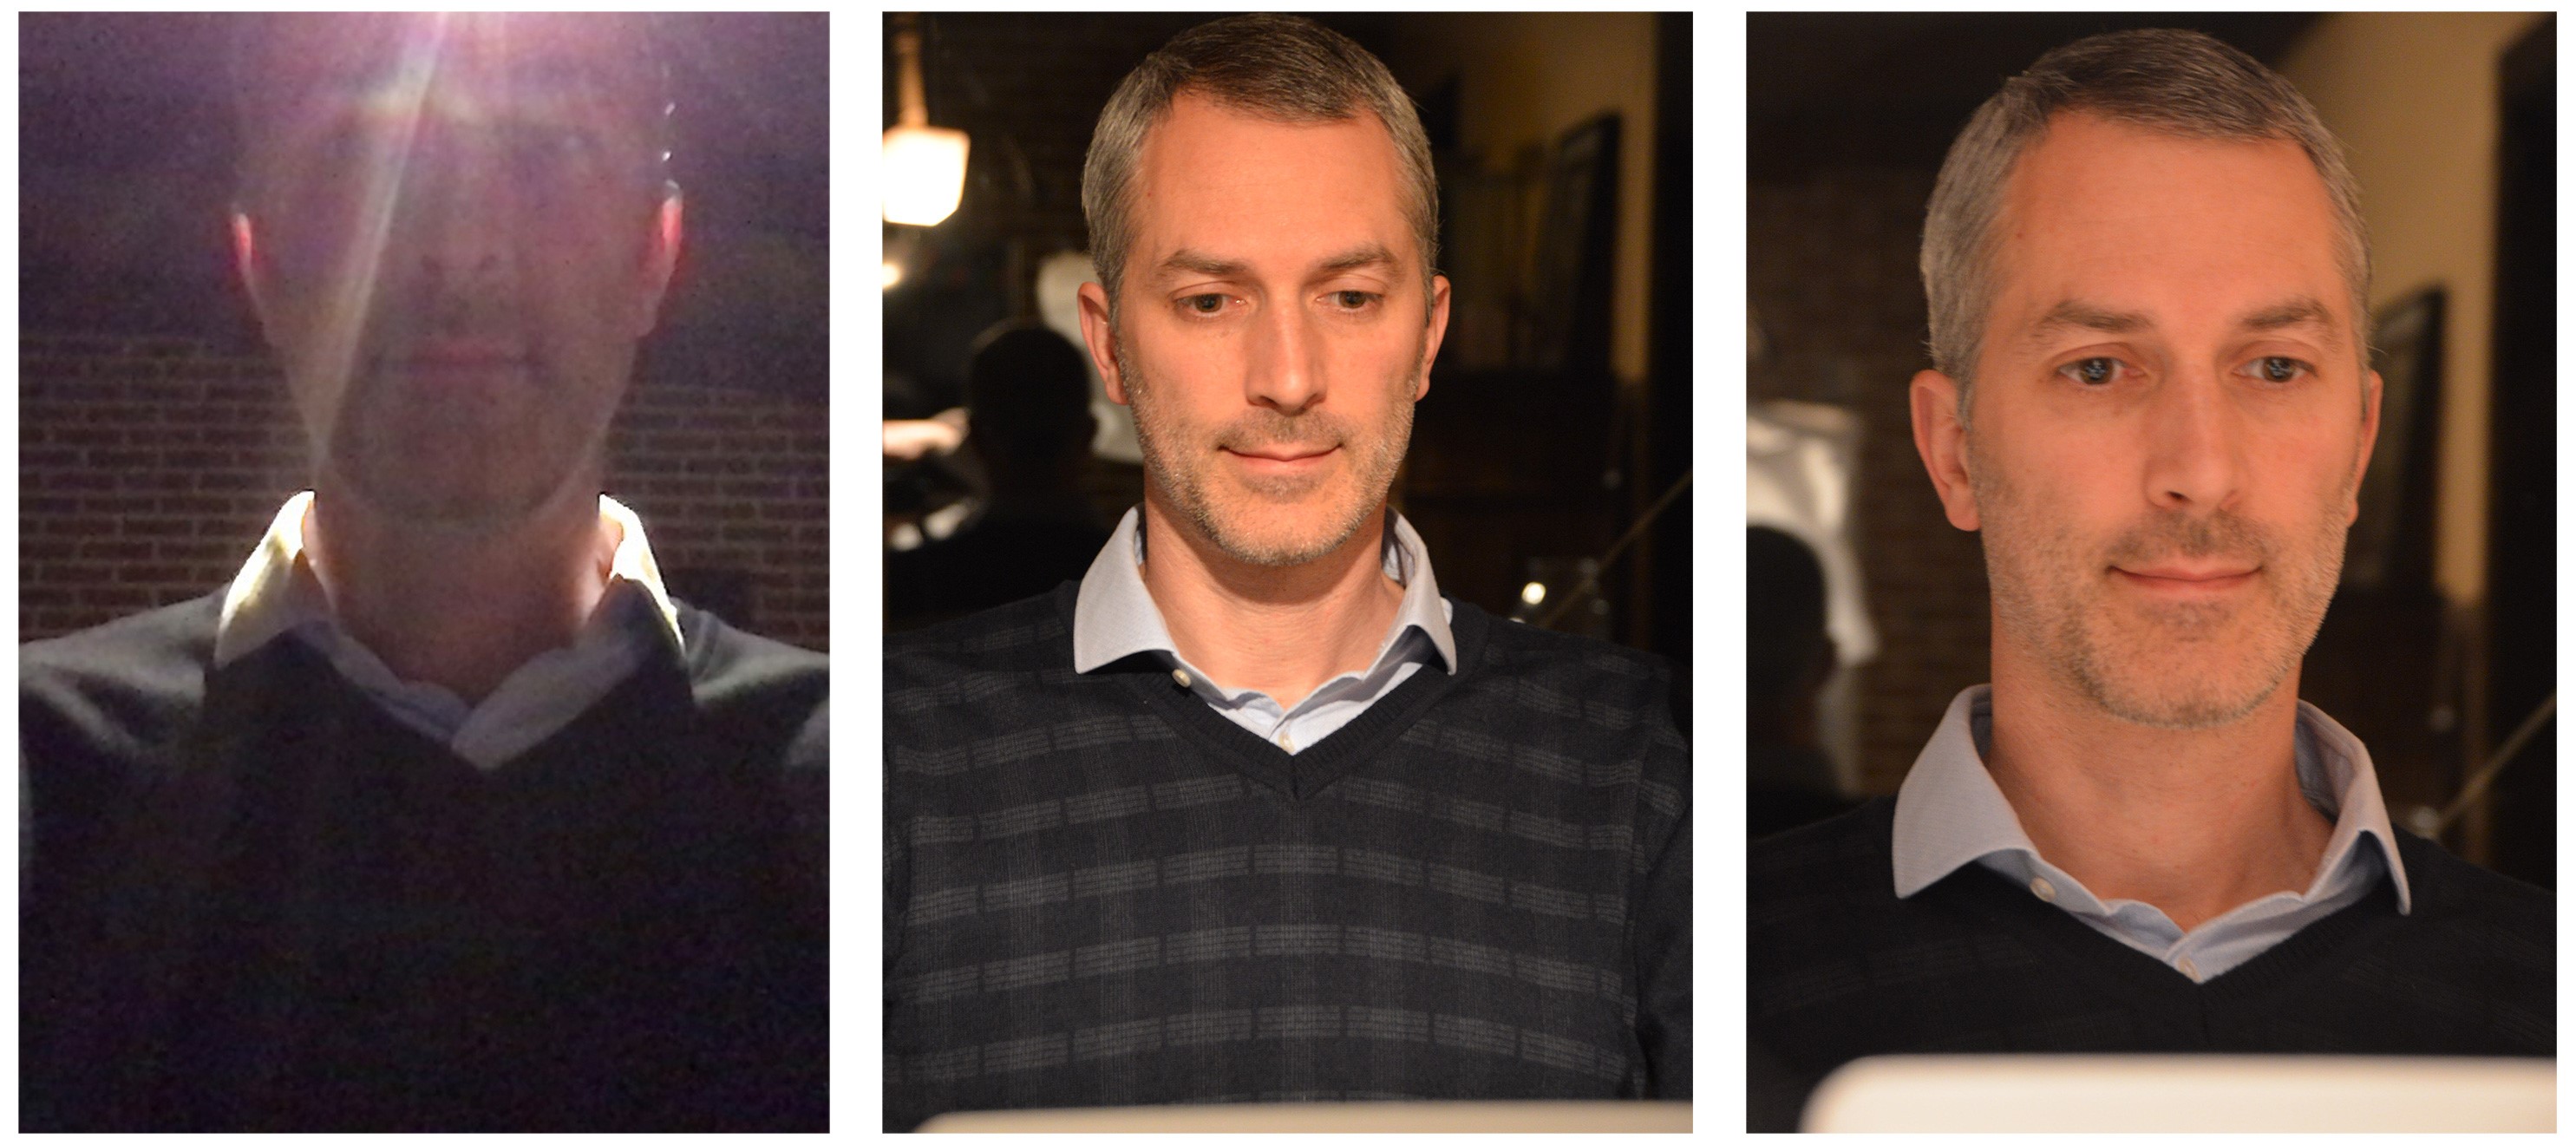
Let’s start with a regular window. If the window is too far behind you, your face will appear to dark and a sharp contrast can occur. The left panel shows a large contrast difference resulting in a face that is barely recognisable. We could use the solution mentioned above using a cardboard to light up the face somewhat (middle panel) but this often renders insufficient results. As we cannot move the window in the building to reach an optimal position, we can only move our own position and orientation in the room to optimally catch the light. A solution can then be to move backwards or to change your orientation, even if this might not be your normal working position. Very often still, you will end up with a very darkened side of your face and similar tricks as above can be applied : either moving closer to a bright wall to reflect more light, or using paper and a cardboard, or some white styrofoam to reflect the light back to the darker side of you face (right panel).
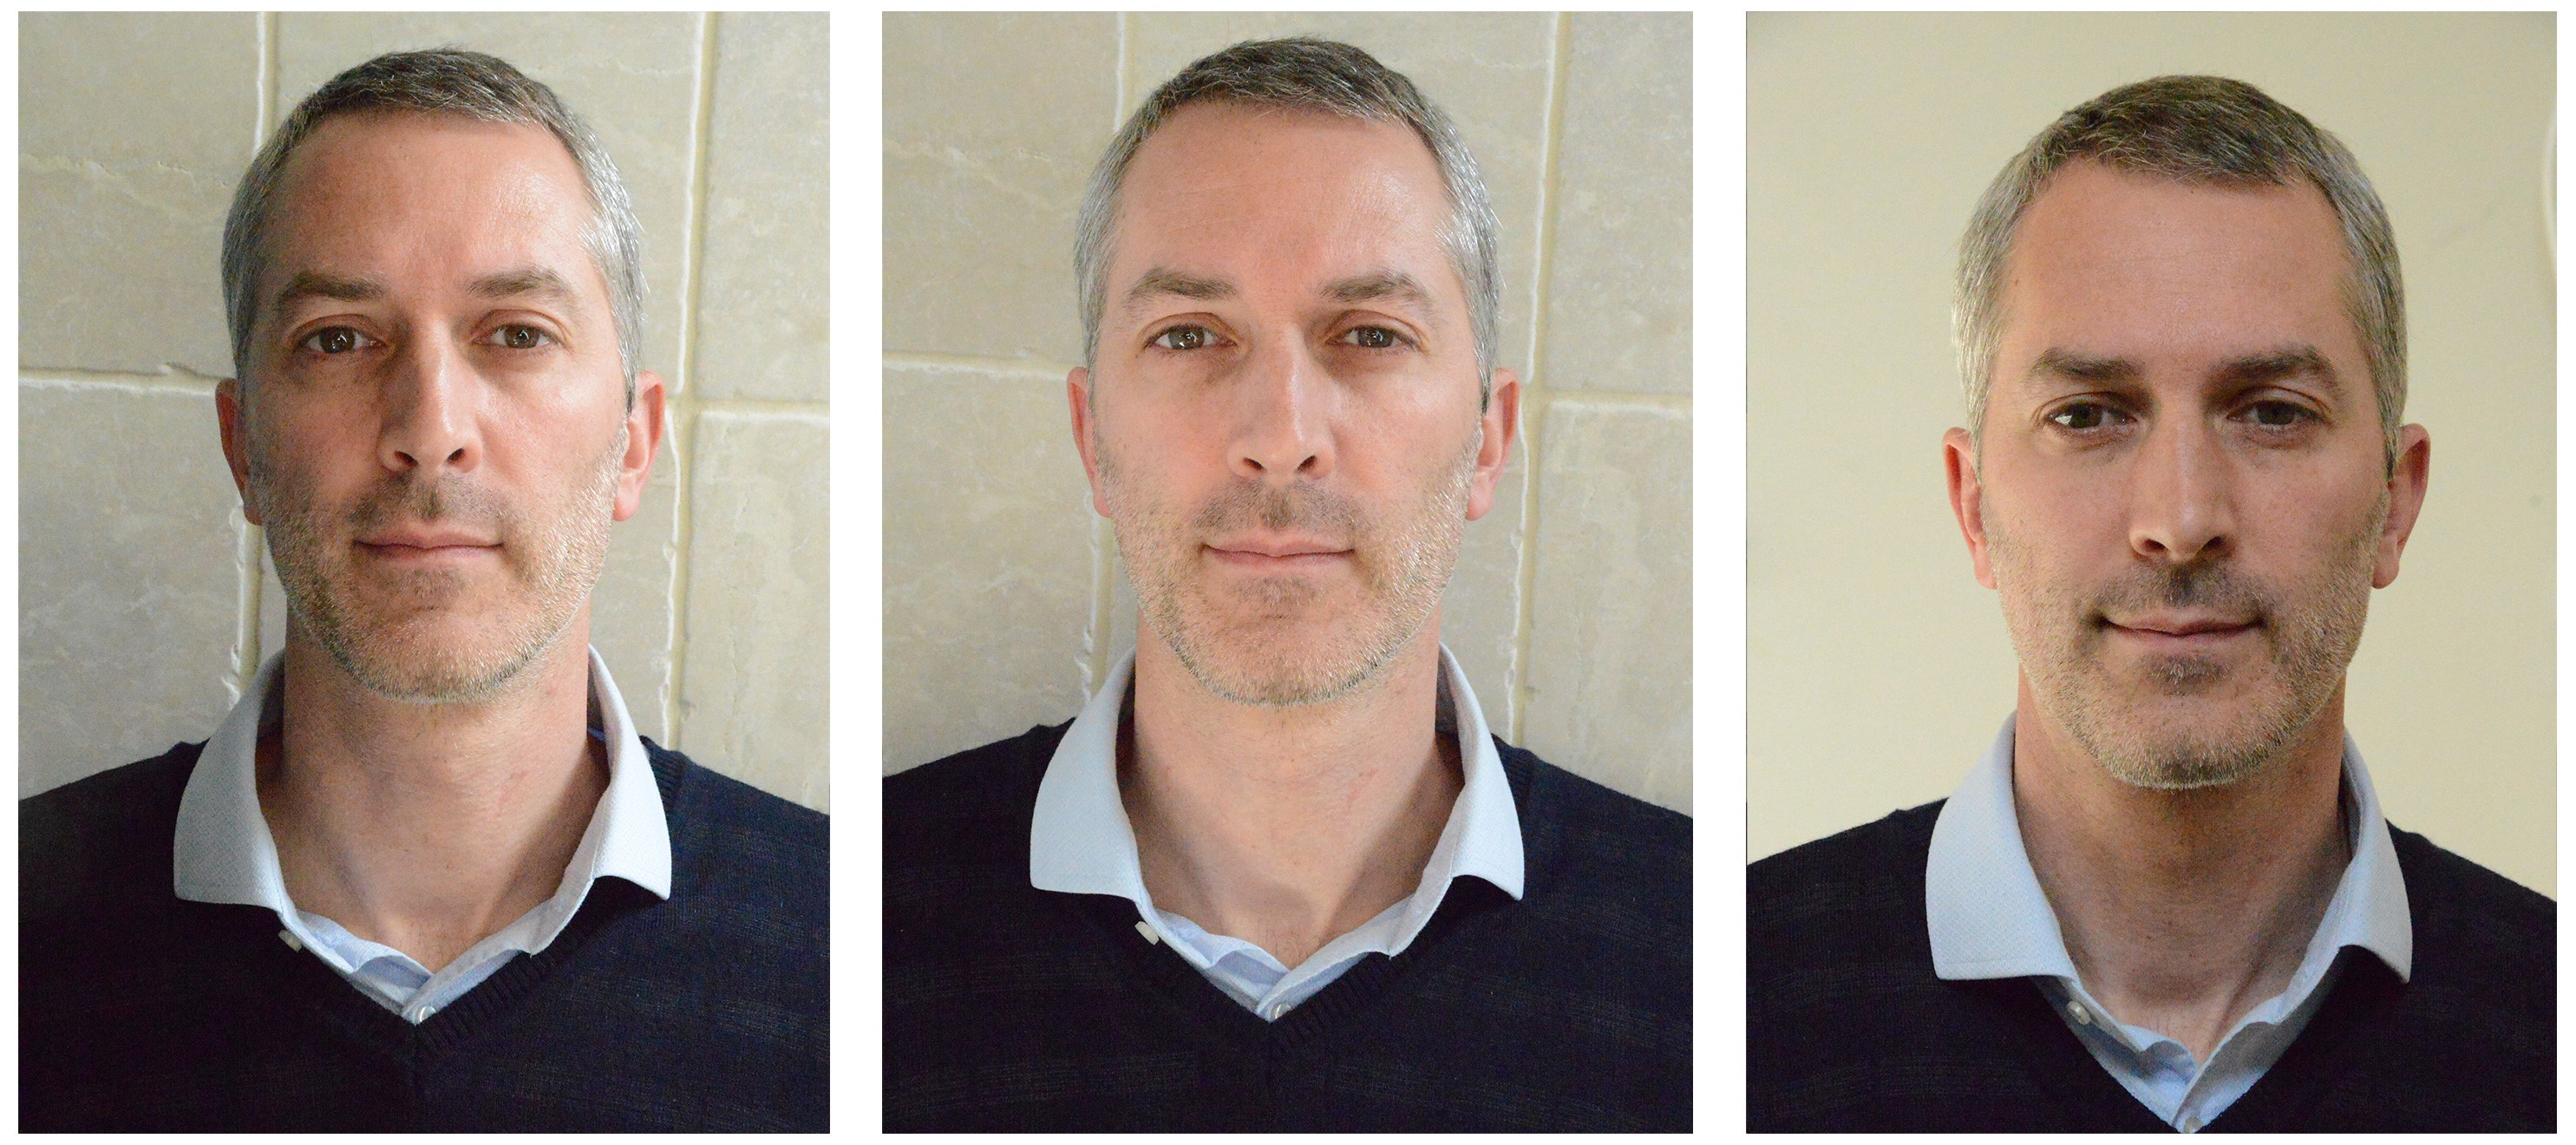
Note that when working under a roof window, extremely nice results can be achieved as it is a diffuse lighting that comes from above, thus creates a natural and soft shadow and leads to a good modelling of your face, a parameter that estimates the optimal ratio between direct and diffuse light on a face. Going from left to right, we see the result when the window is on one side of a person (left panel), when using a cardboard to light up the darker part of the face (middle panel) and when turning our position in the room towards the roof window (right panel).
Artifical lightning:
Next, some tricks when working with artificial lighting, though the same principles apply. If you work in a room with just one centrally mounted light source, try catching the light with your face and rearrange your laptop accordingly. Don’t sit right underneath the light source as this will cast shadows on your face as can be seen in the left panel, yet move a bit away from this position.
Try using light sources that take up a large solid angle with respect to your face. When using a small spot-light, hard shadows are inevitable, as can be seen in the middle panel (in the background reflection you can see the light source taking up a small solid angle), but you can easily diffuse that light by placing a diffusing object between the light source and yourself : e.g. if the light source is very bright, you can use some sheets of paper, or else you might even use transparent document storage bags. The effect is that you increase the solid angle of the source and reduce the hard shadows. If you do not have this at home, you can sit with your laptop near a bright wall and use a bright light that you shine onto the wall. If the wall is not specular, it will reflect the light in all directions thus increasing the size of the light source and reducing too harsh shadows, as can be seen in the right panel. Notice the larger solid angle of the diffused light source in the reflection of the glass in the back.
Toolset:
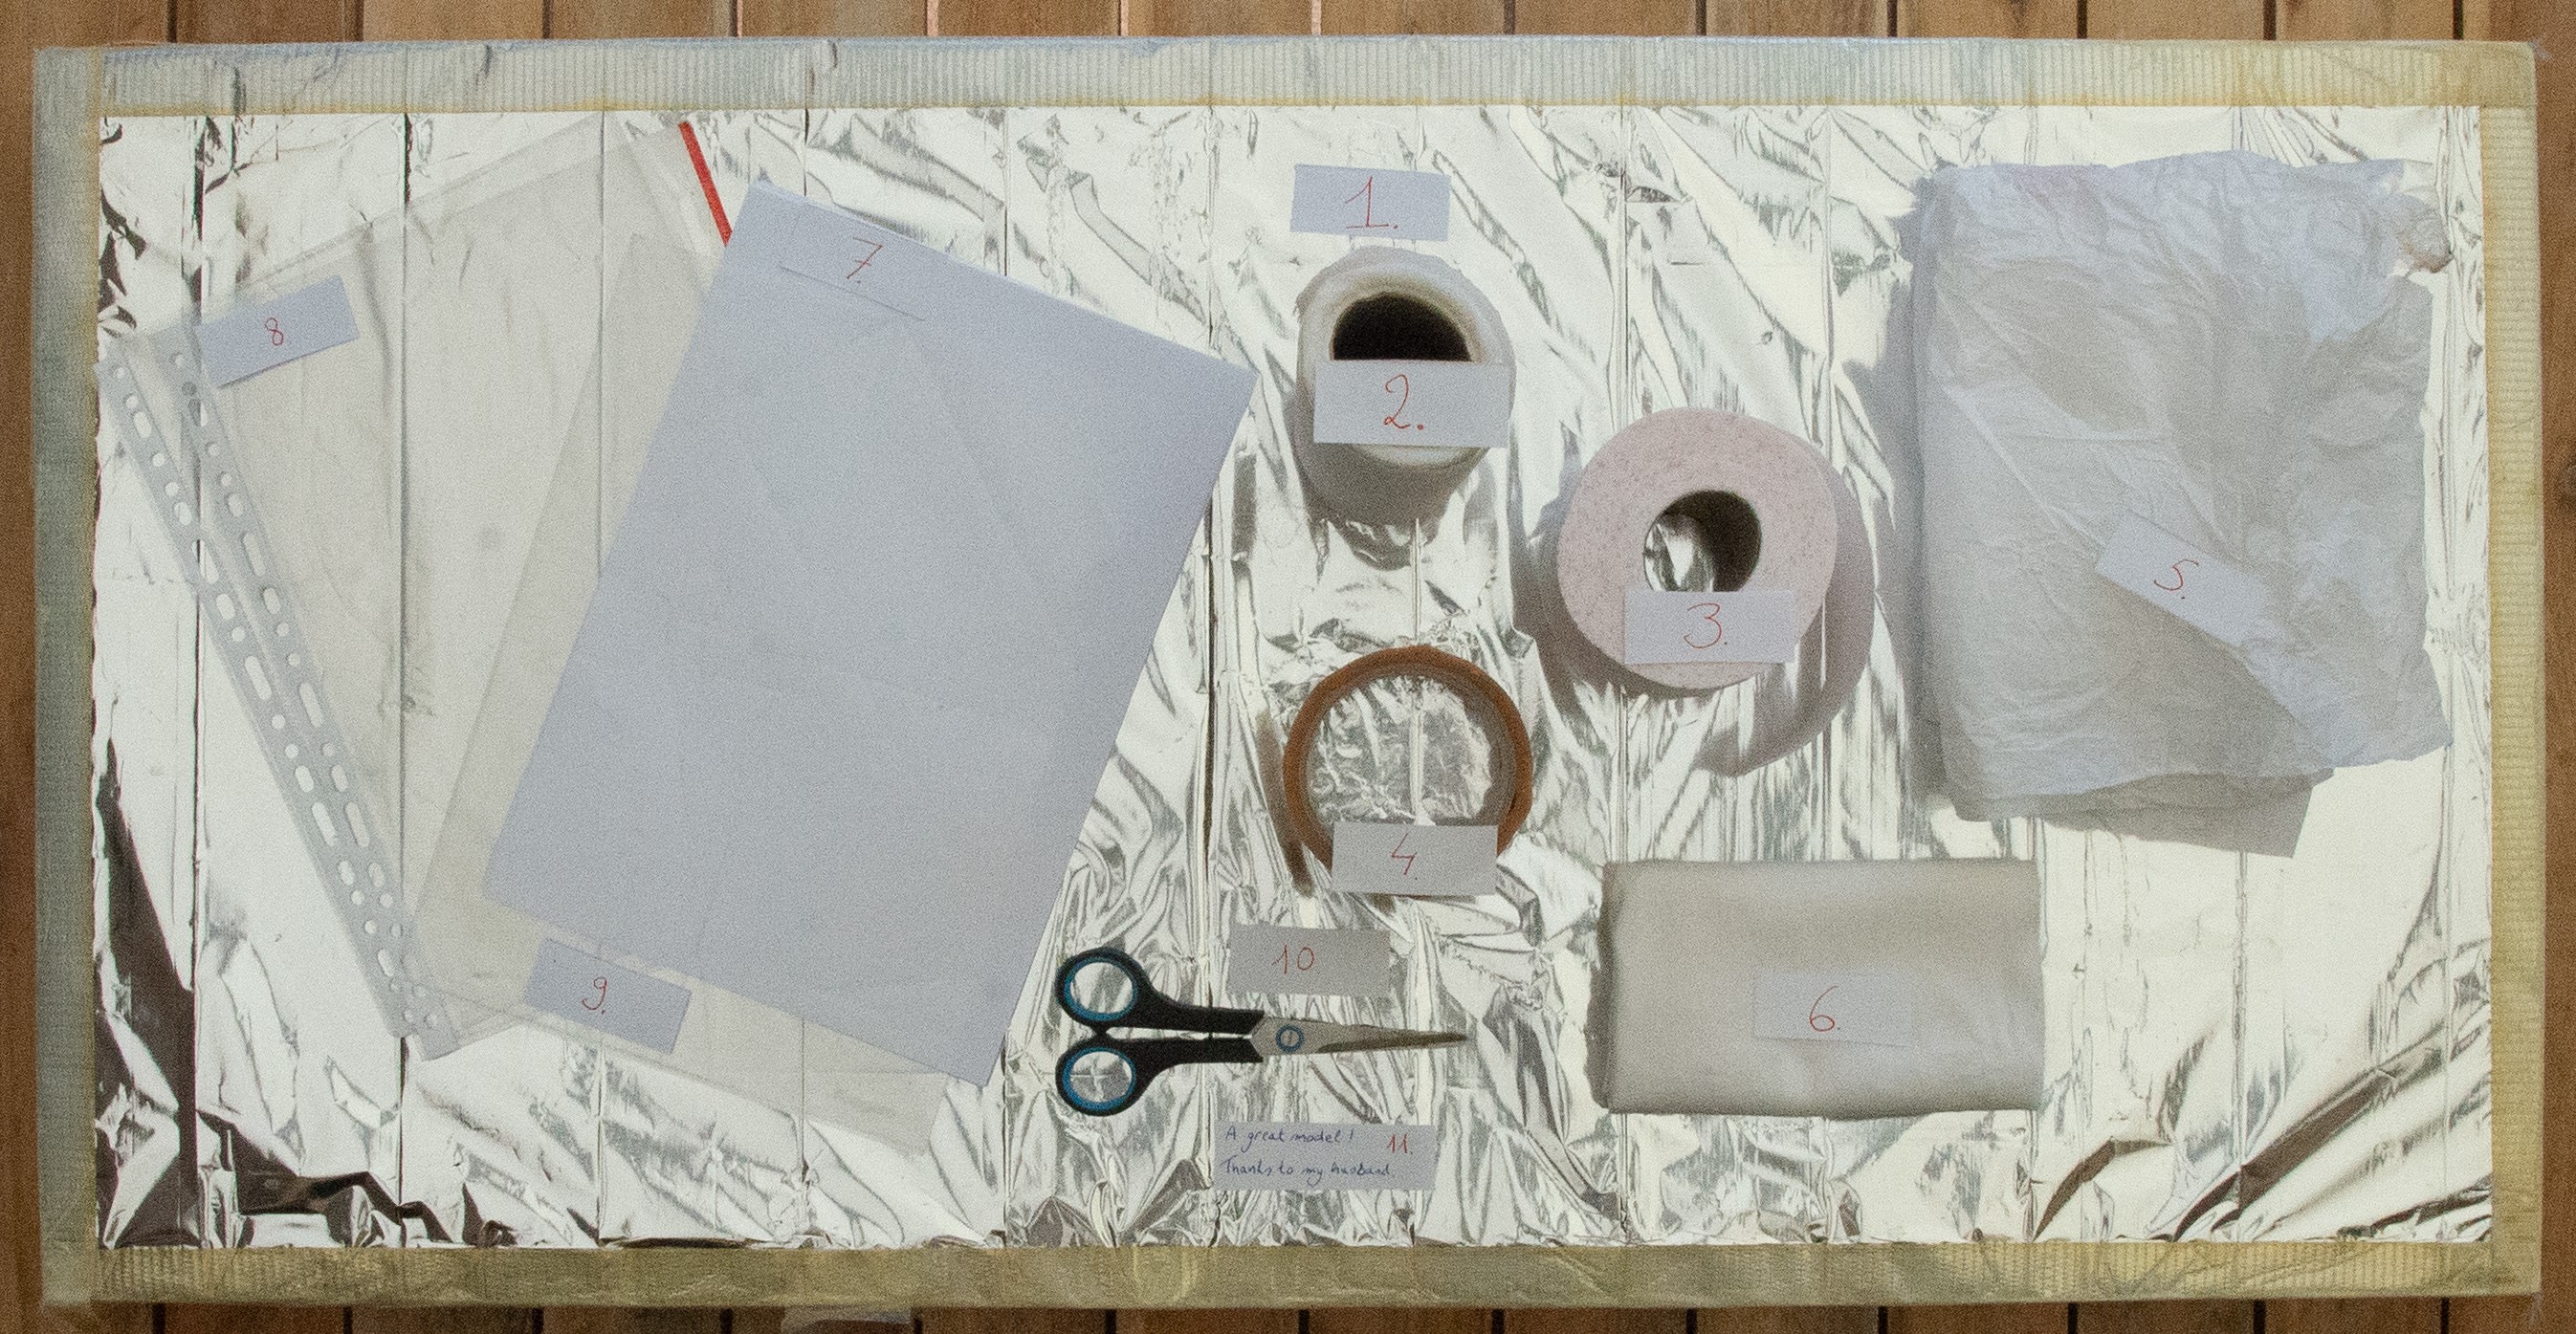
As promised, I would show you the tools I used to make these pictures: 1. A background in styrofoam that has aluminium foil taped to one side. 2. Kitchen paper. 3. Toilet paper, not to be wasted. 4. Tape. 5. White paper that I found in a shoe box, very thin and translucent, great for product photography. 6. Cleaning cloth made from a thicker fabric, very diffuse. 7. White A4 paper. 8 & 9 transparent document storage bags. 10 scissors.
A final word:
Next time we have a virtual meeting, I hope to see how you implemented the guidelines mentioned in this article. Keep experimenting, and do not hesitate to send me your feedback, or pictures of the ingenious solutions you came up with.
Because it is only in the absence of light, that darkness emerges, I dedicate this article to Prof. Dr. Ir. Patrick Rombauts (27/03/1954—22/03/2020), one of the torchbearers of our university who made holes in the darkness.